Relay servers can be added to Rudder, for example to manage a DMZ or to isolate specific nodes from the main environment for security reasons.
Relay server’s purpose is to solve a simple problem: sometimes, one would want to manage multiple networks from Rudder, without having to allow all the subnet access to the other for security reasons. A solution for this would be to have a kind of "Rudder" proxy that would be relaying information between the subnet and the main Rudder server. This is the reason relay servers were created.
Using a relay, you are able to:
- Separate your Rudder architecture into separate entities that still report to one server
- Prevent laxist security exceptions to the Rudder server
- Ease maintenance
The first part is to be done on the machine that will become a relay server. The procedure will:
- Add the machine as a regular node
- Configure the relay components (Syslog, Apache HTTPd, CFEngine)
- Switch this node to the relay server role (from the root server point of view)
To begin, please install a regular Rudder agent on the OS.
See here for the complete reference about agent installation.
To complete this step, please make sure that your node is configured successfully and appears in your Rudder web interface.
# RHEL-like (RHEL, CentOS, Scientific)
yum install httpd httpd-tools rsyslog
# All required modules are enabled by default

# Debian-like (Debian, Ubuntu)
apt-get install apache2 apache2-utils rsyslog
a2enmod dav dav_fs
a2dissite default

# SuSE
zypper install apache2 apache2-utils rsyslog
a2enmod dav dav_fs
mkdir -p /opt/rudder/etc /var/log/rudder/apache2 /var/rudder/share

for i in /var/rudder/inventories/incoming /var/rudder/inventories/accepted-nodes-updates
do
        mkdir -p ${i}
        chmod -R 1770 ${i}
        for group in apache www-data www; do
                if getent group ${group} > /dev/null; then chown -R root:${group} ${i}; break; fi
        done
done

for i in /opt/rudder/etc/htpasswd-webdav-initial /opt/rudder/etc/htpasswd-webdav
do
        /usr/bin/htpasswd -bc ${i} rudder rudder
done

touch /opt/rudder/etc/rudder-networks.conf
- /etc/httpd/conf.d/rudder-default.conf file on RHEL-like
- /etc/apache2/sites-enabled/rudder-default file on Debian-like
- /etc/apache2/vhosts.d/rudder-default.conf file on SuSE
<VirtualHost *:80>
        ServerAdmin webmaster@localhost
        # Expose the server UUID through http
        Alias /uuid /opt/rudder/etc/uuid.hive
        <Directory /opt/rudder/etc>
                Order deny,allow
                Allow from all
        </Directory>
        # WebDAV share to receive inventories
        Alias /inventories /var/rudder/inventories/incoming
        <Directory /var/rudder/inventories/incoming>
                DAV on
                AuthName "WebDAV Storage"
                AuthType Basic
                AuthUserFile /opt/rudder/etc/htpasswd-webdav-initial
                Require valid-user
                Order deny,allow
                # This file is automatically generated according to
                # the hosts allowed by rudder.
                Include /opt/rudder/etc/rudder-networks.conf
                <LimitExcept PUT>
                        Order allow,deny
                        Deny from all
                </LimitExcept>
        </Directory>
        # WebDAV share to receive inventories
        Alias /inventory-updates /var/rudder/inventories/accepted-nodes-updates
        <Directory /var/rudder/inventories/accepted-nodes-updates>
                DAV on
                AuthName "WebDAV Storage"
                AuthType Basic
                AuthUserFile /opt/rudder/etc/htpasswd-webdav
                Require valid-user
                Order deny,allow
                # This file is automatically generated according to
                # the hosts allowed by rudder.
                Include /opt/rudder/etc/rudder-networks.conf
                <LimitExcept PUT>
                        Order allow,deny
                        Deny from all
                </LimitExcept>
        </Directory>
        # Logs
        ErrorLog /var/log/rudder/apache2/error.log
        LogLevel warn
        CustomLog /var/log/rudder/apache2/access.log combined

</VirtualHost>
Finally, restart Apache to take these changes into account:
# RHEL-like (RHEL, CentOS, Scientific)
service httpd restart

# Debian-like (Debian, Ubuntu) and SuSE
service apache2 restart
When every step has completed successfully:
- The Rudder root server will recognize the new node as a relay
- It will generate specific promises for the relay
- The relay will update and switch to his new role
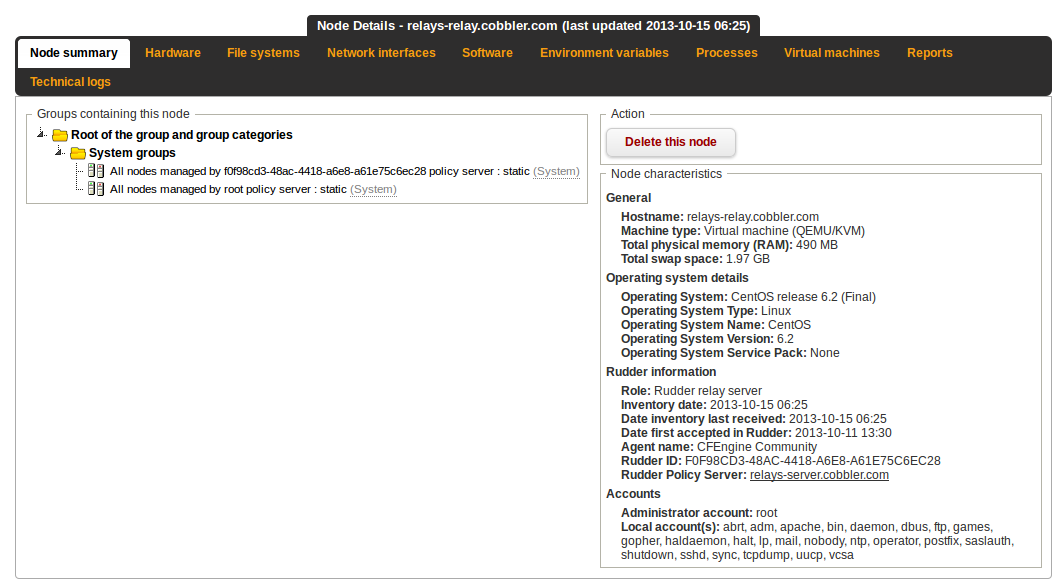
This is an example of node details pane showing a relay server. Note the "Role: Rudder relay server" part that shows that the machine has successfully changed from a node to a relay.
When you have at least one relay, you will likely want to add nodes on it.
You then have two possible cases:
- You want to switch an already existing node to the relay
- You want to add a new one
The procedure on both cases is the same, you have to:
- Create / update the file /var/rudder/cfengine-community/policy_server.dat with the IP address or the fully qualified domain name of the relay server (instead of the root server)
echo "rudder-relay.example.com" > /var/rudder/cfengine-community/policy_server.dat
- Trigger an inventory immediately to make sure the node is registered correctly
/var/rudder/cfengine-community/bin/cf-agent -KI -D force_inventory
After those steps, the node should be registered correctly on your Rudder infrastructure.
